
Anything that is sold in the system is referred to as Items.
Items are categorised into groups and subgroups for ease of management and reporting and are also tied into any existing nominal coding structure for revenue analysis.
For example:
· Group - Bar
· Sub Group - Draught Beer
· Item - Guinness (Pint)
You can create item associations and options so that when an item is sold through EPOS the user will be offered the associated items or options to select from
For example:
Gin and Tonic (How to Create Item associations)
Steak cooking preferences (How to Create Item Options)
1. Click on the Items Icon in the Areas section of the screen.

2. Click on Item from the Shortcuts Menu under the heading of New.
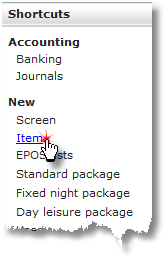
3. Complete the Item details form. The fields with a red dot are mandatory fields.
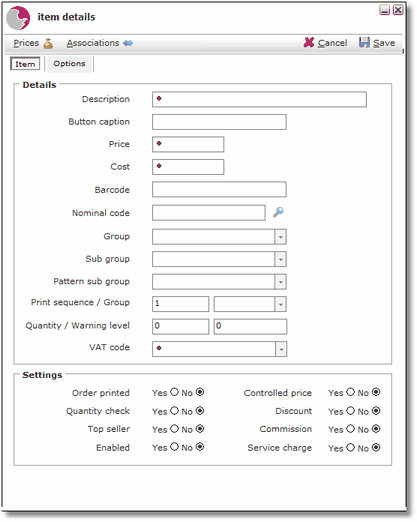
Details:
Description: The name of the item.
Button Caption: This field will default to the title entered in the description field, however as this is displayed on the till, it may require amending. The text must be less than 15 characters.
Price: The total price that a guest would pay for the item.
Cost: The cost of the item to the business.
Barcode: If a barcode scanner is used via the Epos till the code will need to be entered.
Nominal Code: This is an accounting code that the item will be attached to for accounting purposes. Use the magnifying glass to search for existing codes that relate to the item.
Group: Item groups are used to categorise items for sale into logical groups.
For example: food, bar, restaurant.
Can't see the group? See How to Create New Item Group
Sub Group: Item subgroups are used to categorise items for sale into logical groups. i.e. food would be the group and desserts would be the sub-group.
Can't find the subgroup? See How to Create New Item Subgroup
Pattern Sub Group: An alternative sub-group for an item can be selected to work with package allowance patterns. So that it can be sold to residents as part of an inclusive dinner package.
See How to Add Allowance to a Package
Print Sequence: Controls the order that items print out on receipts/orders. A typical way to group items would be to use the following settings: 1 - starters, 2 - mains, 3 - desserts, 4 - drinks, etc.
Print Group: Specifies which printer an item would be sent to if order printing is enabled.
For example: if there is more than 1 kitchen printer set up, starters could be sent to kitchen printer 1 and mains and desserts sent to kitchen printer 2.
Quantity: The total number of an item in stock can be set to track its sales. See below.
Warning Level: A warning message will appear on EPOS to advise the user the stock item is running low.
For example: if 10 steaks are set as the quantity at the beginning of service and a warning level of 3 is entered, EPOS will display a message to notify the user when there are only 3 steaks left to sell.
VAT Code: There are several types of VAT Codes to select from the drop-down list. The correct code will need to be entered for the item.
Settings:
Order Printed: If kitchen order printers have been set up and Yes is selected the item will be printed when purchased. Select No if kitchen order printers have not been set up.
Quantity Check: To track specific sale items as described in quantity and warning Level above select Yes. Select No if the item doesn't require to be tracked.
Top Seller: This feature is used for EPOS lists to help a user locate items that are commonly used quickly. If Yes is selected an item will appear in the top seller's section of any list it is included in. If No is selected an item will appear on a list in alphabetical order as the default setting.
Enabled: If Yes is selected an item can be sold.. Select No when an item is discontinued or may not be available to be sold for a period of time.
Controlled Price: If Yes is selected this will fix the price set up against the item, if No is selected the item price will default to 0.00 and can be manually entered.
Discount: If Yes is selected discounts can be applied to the item via EPOS. If No is selected the item will not be available to discount.
Commission: Items can be set up to record the users that sold a particular item to receive a commission for it. This could be used as a selling tool to encourage users to upsell an item
For example: a bottle of the most expensive Champagne in stock or Spa products.
Service Charge: If Yes is selected the service charge will automatically be applied to the item when it is sold on EPOS, if No is selected the service charge will not be applied.
4. Click Save.
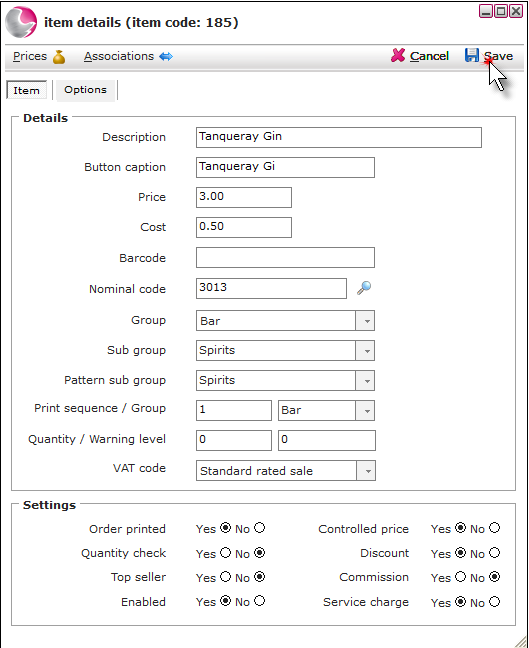
See next: How to Disable and Delete Items
How to Find an Item